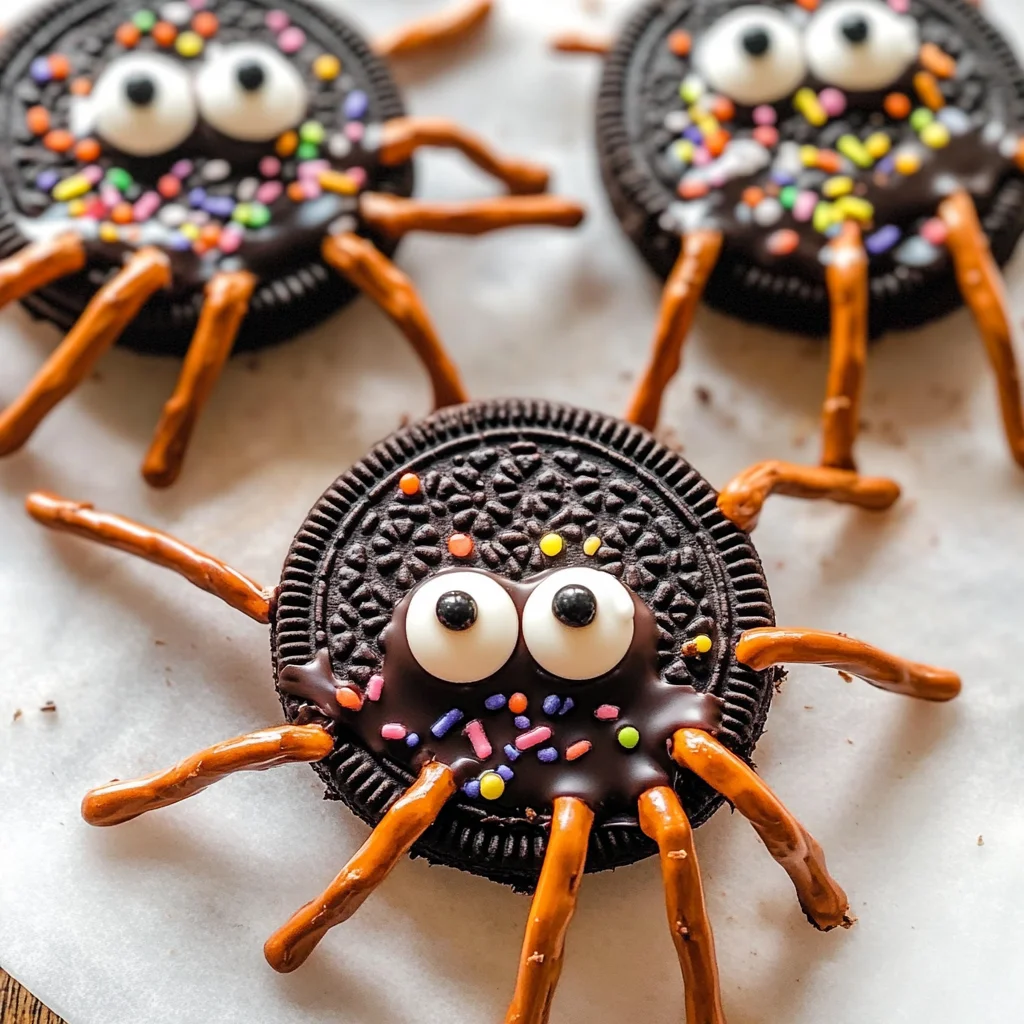
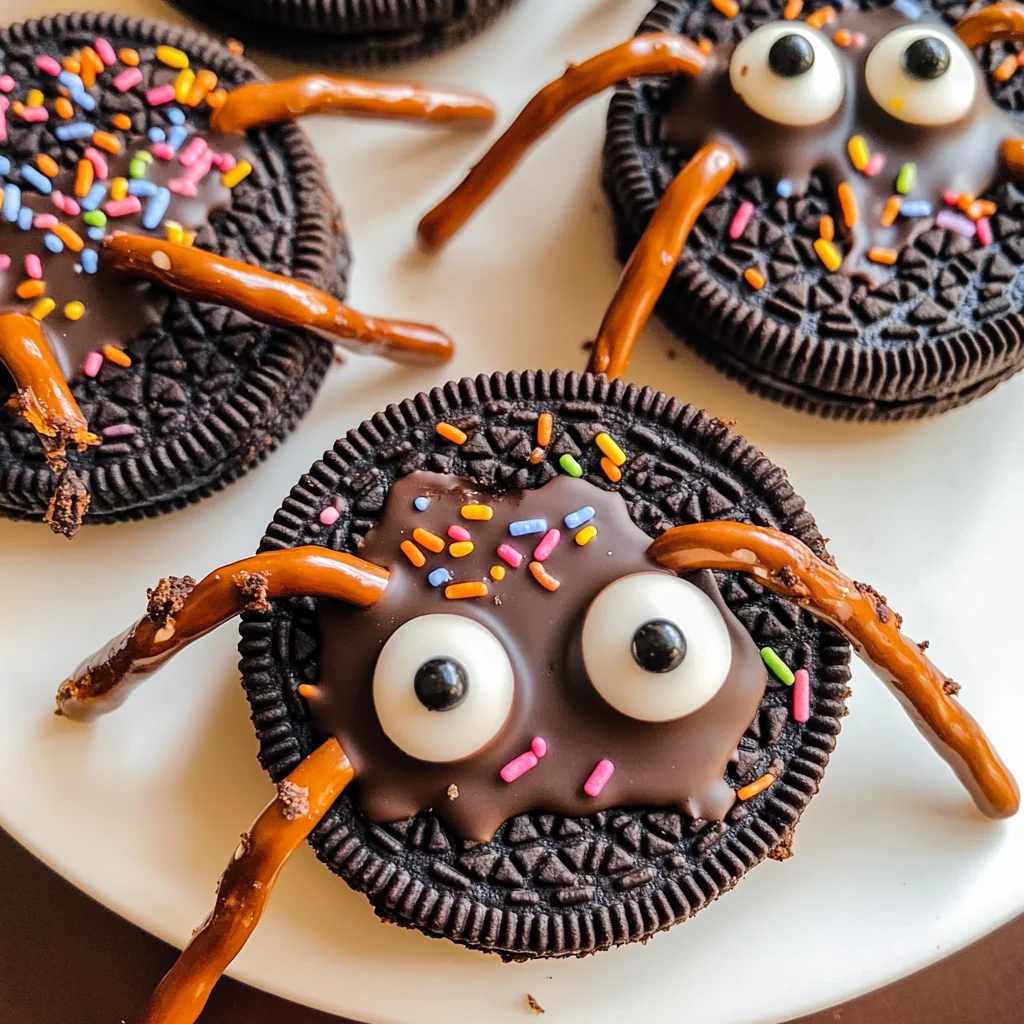
Oreo Spider Halloween Cookies
Get into the spooky spirit with these Oreo Spider Halloween Cookies! Perfect for Halloween parties or a fun activity with kids, these cookies are as delightful to make as they are to eat. The combination of creamy Oreos and fun decorations creates an irresistible treat that will charm everyone at your gathering.
Why You’ll Love This Recipe
- Simple and Quick: With just a 20-minute prep time, these cookies are easy to whip up, making them perfect for last-minute party planning.
- Kid-Friendly Activity: Involve your little ones in the process! Decorating the cookies can be a fun family bonding experience.
- Deliciously Fun: The mix of chocolate and crunchy pretzel legs offers a unique flavor and texture that everyone will love.
- Versatile Decor: Customize your Oreo spiders with different sprinkles or candy eyes for a unique touch every time.
- Perfect for Any Occasion: Whether it’s Halloween or a themed party, these cookies add a festive flair that suits any celebration.
Tools and Preparation
Before you dive into making these delicious Oreo Spider Halloween Cookies, gather your tools. Having everything on hand will streamline the process and ensure you enjoy making these spooky treats.
Essential Tools and Equipment
- Mixing bowl
- Microwave-safe bowl
- Baking sheet
- Parchment paper
- Spoon
Importance of Each Tool
- Mixing bowl: Essential for combining ingredients like chocolate chips and coconut oil smoothly.
- Microwave-safe bowl: Perfect for melting chocolate without burning it, ensuring your cookies turn out perfectly.
- Baking sheet: Provides a flat surface to cool your cookies after decorating.
- Parchment paper: Prevents sticking and makes cleanup easy after you’re done.
Ingredients
To create these delightful Oreo Spider Halloween Cookies, you will need the following ingredients:
For the Cookie Base
- 1/2 cup chocolate chips (dairy free)
- 1 teaspoon coconut oil
- 12 Oreo cookies (Halloween kind or double stuffed)
For Decoration
- 36 pretzel sticks
- 12 dozen small candy eyeballs
- 3 tablespoons sprinkles
How to Make Oreo Spider Halloween Cookies
Step 1: Melt the Chocolate
To start, add 1/2 cup of chocolate chips and 1 teaspoon of coconut oil into a microwave-safe bowl.
1. Microwave the mixture for about one minute, stirring occasionally until fully melted.
Step 2: Assemble the Spiders
Next, break 3 pretzel sticks in half to create spider legs.
1. Twist each Oreo cookie to remove the top wafer (the blank side).
2. Press three pretzel halves into the cream side of each Oreo.
3. Pour about 1/2 teaspoon of melted chocolate on top of the pretzel sticks before placing the ‘blank’ wafer back on top.
Step 3: Decorate Your Cookies
Now it’s time to get creative!
1. Dip one side of each assembled cookie into the remaining melted chocolate.
2. Place two small candy eyes on top of each cookie before sprinkling with colorful sprinkles.
Step 4: Chill and Enjoy
Finally, allow your cookies to set!
1. Place the finished cookies in the fridge for at least 10 minutes so the chocolate hardens properly.
2. Enjoy your delightful Oreo Spider Halloween Cookies at your next gathering!
These treats are sure to be a hit this Halloween season!
How to Serve Oreo Spider Halloween Cookies
These Oreo spider Halloween cookies make a delightful treat for any Halloween gathering. Here are some creative serving suggestions to make your spooky snacks even more fun!
Cookie Display Ideas
- Arrange on a spooky-themed platter for an eye-catching centerpiece.
- Use decorative cupcake liners to elevate the presentation.
Pair with Festive Drinks
- Serve alongside apple cider or pumpkin spice lattes for a seasonal touch.
- Offer themed mocktails using fruit juices and soda for a refreshing option.
Halloween Treat Bags
- Package individual cookies in clear bags tied with orange ribbons for party favors.
- Include a tag with fun Halloween phrases for an extra festive touch.
Themed Table Settings
- Decorate your table with cobwebs, plastic spiders, and autumn leaves.
- Use Halloween-themed plates and napkins to complete the look.
How to Perfect Oreo Spider Halloween Cookies
To ensure your Oreo spider Halloween cookies turn out perfectly, follow these helpful tips.
- Use quality chocolate: Choose high-quality dairy-free chocolate chips for the best melting consistency.
- Keep cookies chilled: Refrigerate the cookies after decorating to help the chocolate set faster.
- Mix and match decorations: Feel free to use different types of candy eyes or sprinkles for unique designs.
- Work quickly: When assembling, work swiftly so that the melted chocolate doesn’t cool down too much before adding decorations.
Best Side Dishes for Oreo Spider Halloween Cookies
Pairing side dishes with your Oreo spider Halloween cookies can enhance your Halloween spread. Here are some great options!
- Pumpkin Soup: A warm and creamy soup that adds a seasonal flavor to your meal. Serve in small cups for easy handling.
- Witch’s Brew Punch: A refreshing drink made from fruit juices and sparkling water. Add floating fruit slices for an enchanting look.
- Veggie Skeleton Platter: Create a skeleton shape using assorted vegetables and hummus as the dip. It’s healthy and fun!
- Cheesy Ghost Toasts: Top toasted bread with cheese cutouts in ghost shapes, then bake until bubbly.
- Mummy Hot Dogs: Wrap turkey hot dogs in crescent roll dough, bake them until golden, and add mustard eyes for a playful twist.
- Candy Corn Fruit Cups: Layer orange and yellow fruits in cups to resemble candy corn. It’s a sweet yet healthy treat!
Common Mistakes to Avoid
- Avoid using the wrong chocolate: Make sure to use dairy-free chocolate chips to keep the cookies suitable for everyone.
- Don’t overheat the chocolate: Microwaving chocolate for too long can cause it to seize. Heat it in short bursts instead.
- Skip piling on too many sprinkles: While sprinkles add fun, too many can overpower the look and taste. Stick to a light sprinkle.
- Forget to chill the cookies: Chilling helps the chocolate set properly. Be patient and let them cool for at least 10 minutes.
- Avoid using stale ingredients: Fresh ingredients make all the difference in flavor and texture. Check your supplies before starting.
Storage & Reheating Instructions
Refrigerator Storage
- Store Oreo Spider Halloween Cookies in an airtight container for up to 1 week.
- Place parchment paper between layers to prevent sticking.
Freezing Oreo Spider Halloween Cookies
- Freeze cookies in an airtight container for up to 3 months.
- Layer parchment paper between cookies to avoid freezer burn.
Reheating Oreo Spider Halloween Cookies
- Oven: Preheat to 350°F (175°C) and warm cookies for about 5 minutes until just soft.
- Microwave: Heat one cookie at a time on a microwave-safe plate for about 10-15 seconds.
- Stovetop: Gently heat in a skillet over low heat, covered, for a few minutes.
Frequently Asked Questions
What are Oreo Spider Halloween Cookies?
Oreo Spider Halloween Cookies are fun, festive treats made with Oreo cookies, pretzel legs, and candy eyeballs, perfect for Halloween celebrations.
How do I make Oreo Spider Halloween Cookies?
To make these cookies, melt chocolate chips with coconut oil, assemble Oreos with pretzel legs, and decorate with candy eyes and sprinkles.
Can I customize my Oreo Spider Halloween Cookies?
Absolutely! You can use different types of candy or sprinkles to give your cookies a personal touch. Get creative!
How long does it take to prepare Oreo Spider Halloween Cookies?
This fun recipe takes only about 20 minutes from start to finish, making it quick and easy for any occasion.
Are there any alternatives for dietary restrictions?
You can substitute ingredients as needed; use gluten-free Oreos and dairy-free chocolate chips if desired.
Final Thoughts
Oreo Spider Halloween Cookies are not only delightful but also incredibly versatile. You can easily customize them with different candies or decorations. These spooky treats are sure to be a hit at your next gathering—give them a try!
Oreo Spider Halloween Cookies

Get ready to bring some spooky fun into your kitchen with these Oreo Spider Halloween Cookies! These delightful treats are perfect for Halloween parties or a fun-filled family activity. Made with creamy Oreos and decorated with crunchy pretzel legs and colorful candy eyes, they are sure to charm both kids and adults alike. With a quick prep time of just 20 minutes, these cookies are ideal for last-minute celebrations. Let your creativity shine as you customize each cookie with a variety of sprinkles, making every batch uniquely festive. Treat yourself and your loved ones to these deliciously spooky snacks this Halloween!
- Prep Time: 20 minutes
- Cook Time: 0 minutes
- Total Time: 20 minutes
- Yield: Makes approximately 12 cookies 1x
- Category: Dessert
- Method: Baking
- Cuisine: American
Ingredients
- 1/2 cup dairy-free chocolate chips
- 1 teaspoon coconut oil
- 12 Oreo cookies
- 36 pretzel sticks
- 12 dozen small candy eyeballs
- 3 tablespoons sprinkles
Instructions
- Melt the chocolate chips and coconut oil in a microwave-safe bowl for about one minute, stirring until smooth.
- Break pretzel sticks in half to create spider legs. Remove the top wafer from each Oreo.
- Insert three pretzel halves into the cream side of each Oreo, pour melted chocolate on top, and replace the wafer.
- Dip one side of each assembled cookie into remaining melted chocolate, add candy eyes, and sprinkle with colorful decorations.
- Refrigerate for at least 10 minutes to set before serving.
Nutrition
- Serving Size: 1 cookie (30g)
- Calories: 150 kcal
- Sugar: 8g
- Sodium: 50mg
- Fat: 7g
- Saturated Fat: 4g
- Unsaturated Fat: 2g
- Trans Fat: 0g
- Carbohydrates: 20g
- Fiber: 1g
- Protein: 1g
- Cholesterol: 0mg